¶ GCP Deployment | VMware (GCVE)
This deployment guide provides instructions on how to deploy a (3) ESXi host cluster on GCVE.
¶ Initial VMware Cluster Cloud Deployment
You can not deploy a single host environment as it will be deleted within (60) days.
- A single node private cloud will be automatically deleted within 60 days unless upgraded to 3 or more nodes
- VMware Engine does not provide any SLA for a single node private cloud
- Any maintenance or upgrade will result in a downtime for your private cloud
¶ Private Cloud Creation
- Create the Private Cloud
- Select Multi Node if intended to run for past 60 days.
- Input the desired vSphere/vSAN subnet CIDR range
- In the example below, I selected
us-west2 > v-zone-a > VE Placement Group 1

I did not assign a HCX CIDR block prefix; however, it seems that this auto-deployed the subnet
As VMware Engine creates your new private cloud, it deploys a number of VMware components and divides the provided IP address range into subnets. Private cloud creation can take 30 minutes to 2 hours. After the provisioning is complete, you receive an email.
¶ Configuring Regional Settings
- Under the Network tab, locate Regional Settings.
- Assign the region Internet Access, Public IP Service and provide an Edge Service CIDR

- After the Regional Settings has been submitted, it’ll take a few minutes for it to become operational:

¶ Create a VPN Gateway
The service is available if Internet and Public IP service are enabled in Regional Settings and when there is at least 1 Private Cloud created.
- Create the Gateway Configuration
- Select the designated Location (region).
- Provide a unique VPN Gateway Name
- Provide a VPN Client Subnet

¶ Adding Users to VPN
- The administrator can select the following (2) options:
- Automatically add all users
- Select each individual user

¶ Subnets
- Ensure that all toggles are selected:

¶ Finalize VPN Gateway
- Revise all settings and Submit

¶ VPN Creation
- It will take a few minutes for the VPN Gateway to change it’s status from Creating to Operational:

2. Operation Example

¶ Accessing vSphere via the GCP VMware VPN Gateway
- Download VPN Configuration
- Select the VPN Gateway that you created in the previous section.
- Select the Download my VPN Configuration

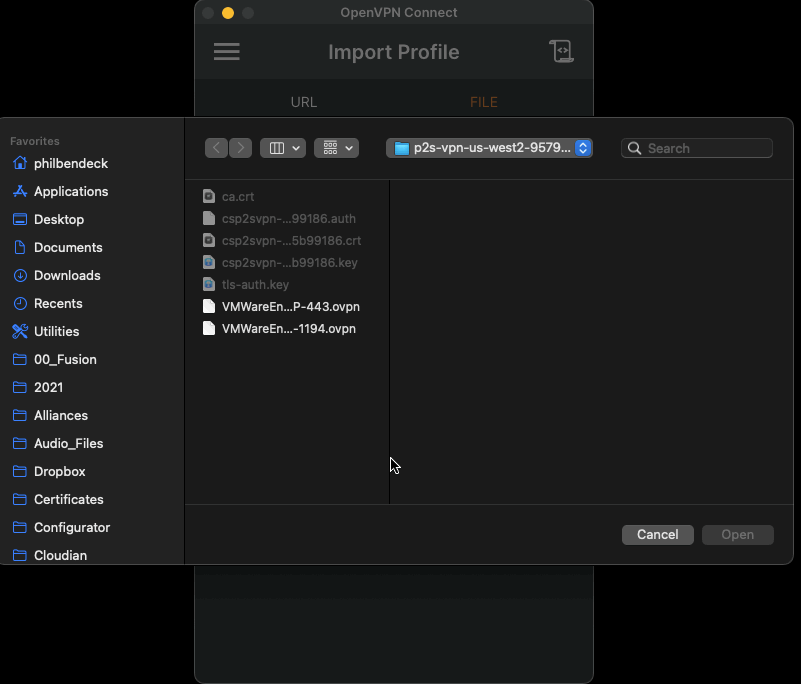
4. The console will provide a zip of the VPN files to connect to the VMware environment:
p2s-vpn-us-west2-957930b2-d616-484b-be4e-1c962c784f30
├── VMWareEngine-TCP-443.ovpn
├── VMWareEngine-UDP-1194.ovpn
├── ca.crt
├── csp2svpn-c4875b99186.auth
├── csp2svpn-c4875b99186.crt
├── csp2svpn-c4875b99186.key
└── tls-auth.keyDownload OpenVPN
Example using macOS
- Locate the file
VMWareEngine-TCP-443.ovpn - Import the profile to the OpenVPN Client and Connect to the VPN Gateway

5. Once you’re successfully connected to the VPN, retrieve the vSphere credentials from the vSphere login info
For example:

6. Access the vSphere UI
7. Using the vSphere credentials from step 5, login into vSphere.
¶ NSX-T Configuration
You must configure distributed network segment in order for the VMs to access the VPC.
Please review Creating your first subnet
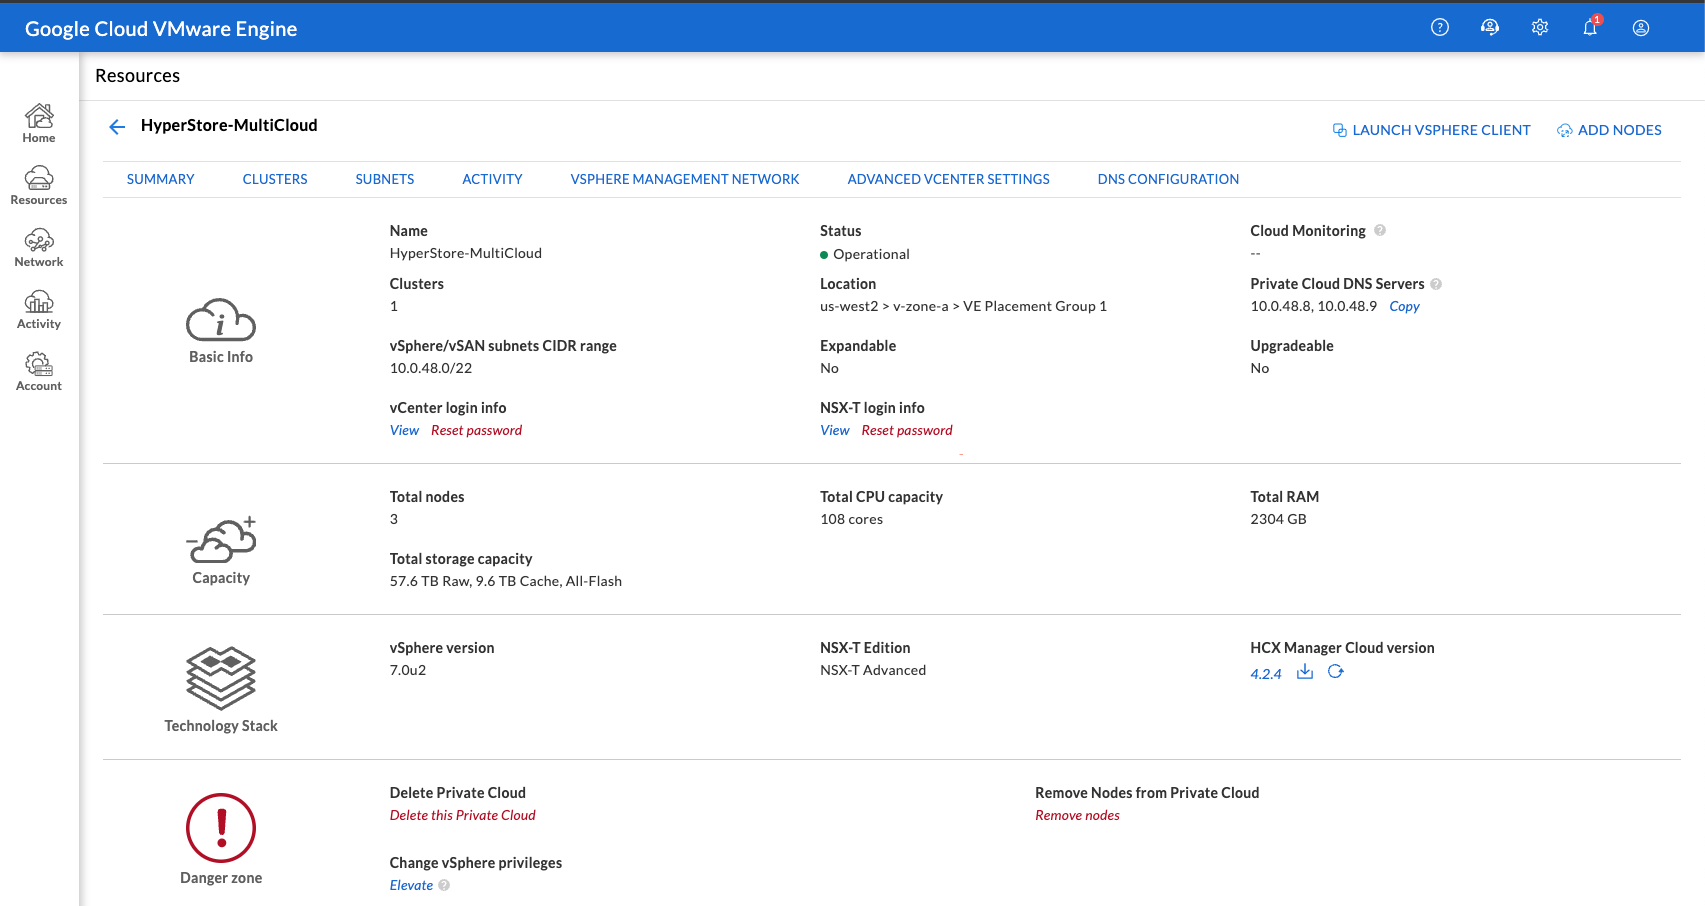
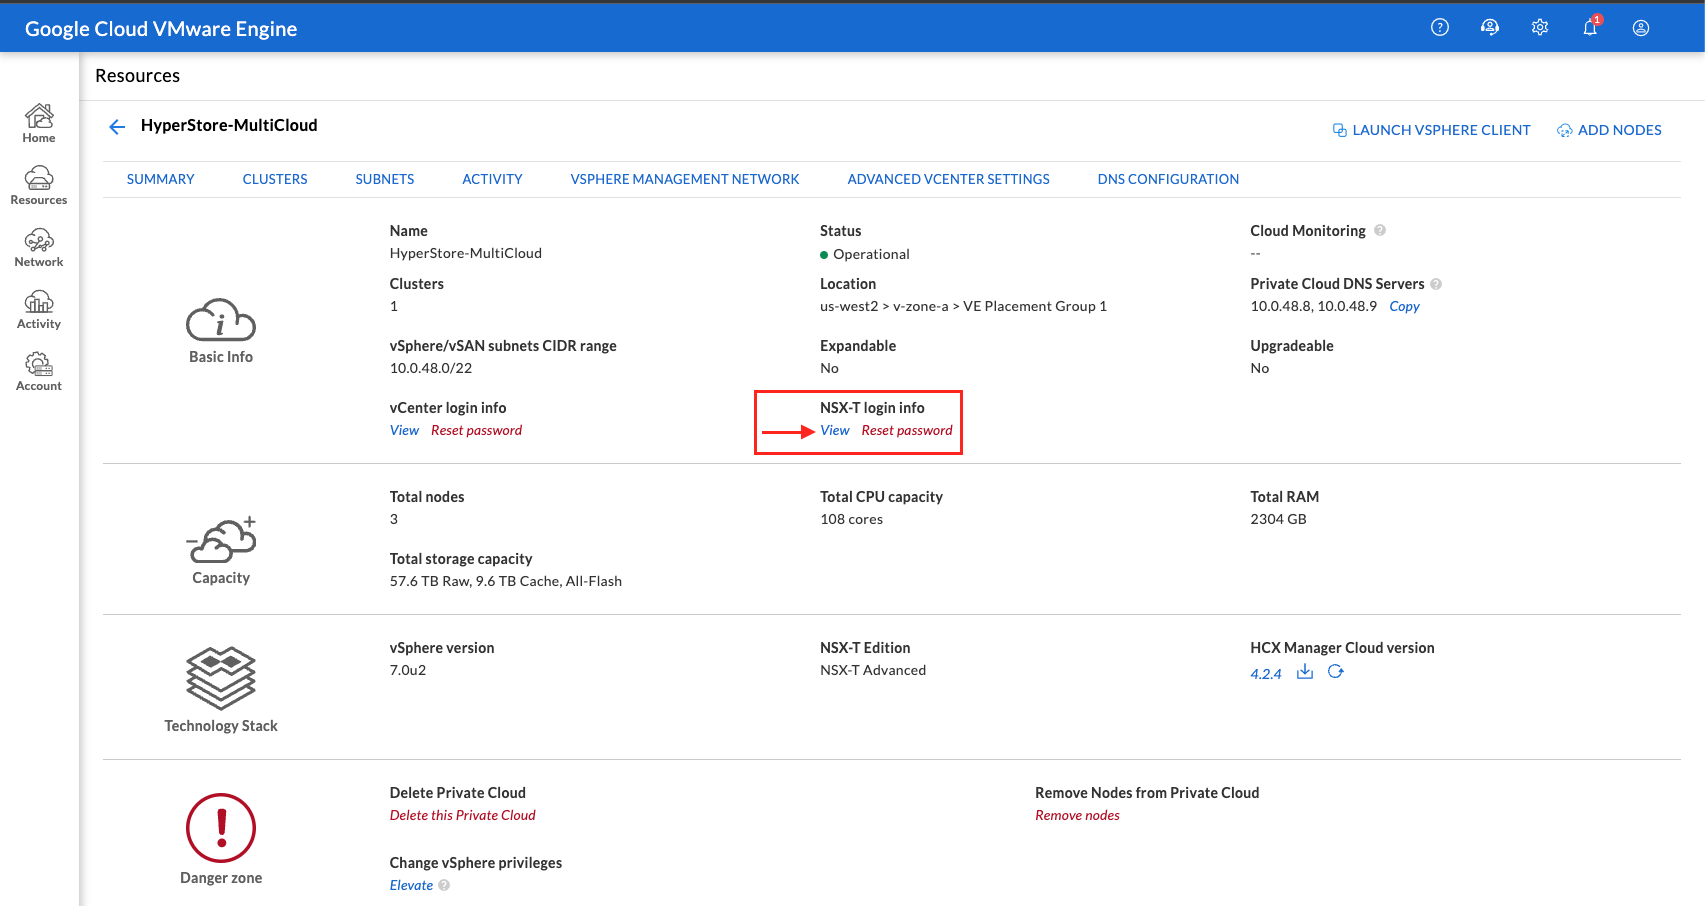
¶ Access NSX-T Manager from the VMware Engine portal
The process of creating a subnet happens in NSX-T, which you access through VMware Engine:
- Access the VMware Engine portal
- From the main navigation, go to Resources.
- Click the Private cloud name corresponding to the private cloud where you want to create the subnet.
- On the details page of your private cloud, click the vSphere Management Network tab.
- Click the FQDN corresponding to NSX Manager.
- When prompted, enter your sign-in credentials. As a reminder, you can retrieve generated credentials from the private cloud details page.
If you've set up vIDM and connected it to an identity source, such as Active Directory, use your identity source credentials instead.
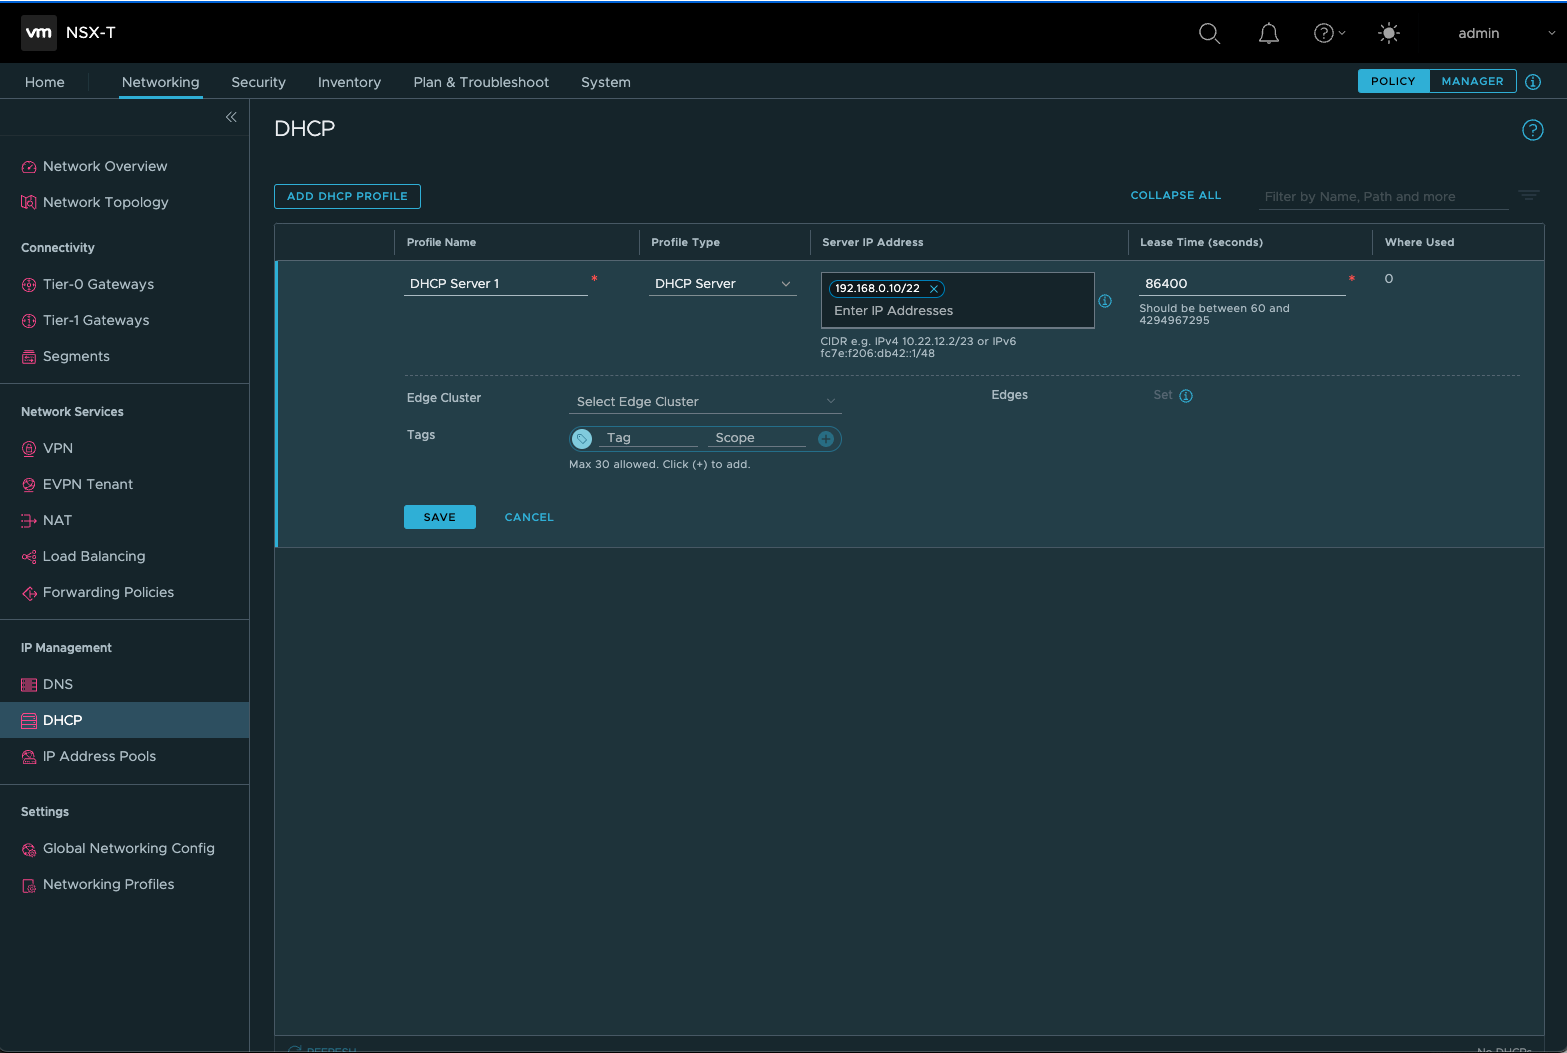
¶ Set up DHCP service for the subnet
Before you can create a subnet, set up a DHCP service:
- In NSX-T, go to Networking > DHCP. The networking dashboard shows that the service creates one tier-0 and one tier-1 gateway.
- To begin provisioning a DHCP server, click Add DHCP Profile.
Note: NSX-T supports DHCP relay as well. For more information, see the VMware documentation for creating a DHCP relay service.
- In the DHCP name field, enter a name for the profile.
- For Profile type, select DHCP server.
- In the Server IP address column, provide a DHCP service IP address range.
- Click Save to create the DHCP service.
Next, attach this DHCP service to the relevant tier-1 gateway. A default tier-1 gateway has already been provisioned by the service:
- In NSX-T, go to Networking > Tier-1 Gateways.
- Click the vertical ellipses next to your tier-1 gateway and select Edit.
- In the DHCP field, click the Set DHCP Configuration link.
- Set Type to DHCP Server and select the DHCP Server Profile that you just created.
- Click Save.
- Click Close Editing.

You can now create a network segment in NSX-T. For more information about DHCP in NSX-T, see the VMware documentation for DHCP.
¶ Create a network segment in NSX-T
For workload VMs, you create subnets as NSX-T network segments for your private cloud:
- In NSX-T, go to Networking > Segments.
- Click Add Segment.
- In the Segment Name field, enter a name for your segment.
- In the Connected Gateway list, select Tier1 to connect to the tier-1 gateway.
- In the Transport zone list, select TZ-OVERLAY | Overlay.
- In the Subnets column, enter the subnet range. Specify the subnet range with
.1as the last octet. For example,10.12.2.1/24. - Click Set DHCP Config, and provide values for the DHCP Ranges field.
- Click Apply to save your DHCP configuration.
- Click Save. You can now select this network segment in vCenter when creating a VM.
In a given region, you can advertise at most 100 unique routes from VMware Engine to your VPC network using private services access. For example, those unique routes include private cloud management IP address ranges, NSX-T workload network segments, and HCX network IP address ranges. This route limit includes all private clouds in the region and corresponds to the Cloud Router learned route limit.
For information about routing limits, see Cloud Router Quotas and limits.

When configuring the DHCP lease range, I elected 192.168.10.50-192.168.10.60
Make sure to add the Private Cloud DNS Servers

¶ NSX-T Network Topology

¶ DHCP Example of a Linux (CentOS) Host
¶ Network File = /etc/sysconfig/network-scripts/ifcfg-ens192
[root@localhost ~]# cat /etc/sysconfig/network-scripts/ifcfg-ens192
DEVICE="ens192"
TYPE="Ethernet"
BOOTPROTO="dhcp"
NM_CONTROLLED="no"
ONBOOT="yes"
USERCTL="no"
IPV6INIT="no"
IPV6ADDR=""
IPV6_DEFAULTGW=""
IPV6_AUTOCONF="no"¶ DHCP Lease Example = /var/lib/dhclient/dhclient--ens192.lease
[root@localhost ~]# cat /var/lib/dhclient/dhclient--ens192.lease
lease {
  interface "ens192";
  fixed-address 192.168.10.50;
  option subnet-mask 255.255.255.0;
  option routers 192.168.10.1;
  option dhcp-lease-time 86400;
  option dhcp-message-type 5;
  option dhcp-server-identifier 192.168.0.10;
  renew 5 2022/06/03 06:20:03;
  rebind 5 2022/06/03 16:41:12;
  expire 5 2022/06/03 19:41:12;
}
lease {
  interface "ens192";
  fixed-address 10.12.88.50;
  option subnet-mask 255.255.255.0;
  option routers 10.12.88.1;
  option dhcp-lease-time 86400;
  option dhcp-message-type 5;
  option dhcp-server-identifier 192.168.0.10;
  renew 5 2022/06/03 07:30:21;
  rebind 5 2022/06/03 16:43:38;
  expire 5 2022/06/03 19:43:38;
}
lease {
  interface "ens192";
  fixed-address 192.168.10.50;
  option subnet-mask 255.255.255.0;
  option dhcp-lease-time 86400;
  option routers 192.168.10.1;
  option dhcp-message-type 5;
  option dhcp-server-identifier 192.168.0.10;
  renew 5 2022/06/03 06:04:50;
  rebind 5 2022/06/03 16:45:02;
  expire 5 2022/06/03 19:45:02;
}
lease {
  interface "ens192";
  fixed-address 192.168.10.50;
  option subnet-mask 255.255.255.0;
  option dhcp-lease-time 86400;
  option routers 192.168.10.1;
  option dhcp-message-type 5;
  option dhcp-server-identifier 192.168.0.10;
  renew 5 2022/06/03 17:23:47;
  rebind 6 2022/06/04 03:04:50;
  expire 6 2022/06/04 06:04:50;
}
lease {
  interface "ens192";
  fixed-address 192.168.10.50;
  option subnet-mask 255.255.255.0;
  option dhcp-lease-time 86400;
  option routers 192.168.10.1;
  option dhcp-message-type 5;
  option dhcp-server-identifier 192.168.0.10;
  renew 6 2022/06/04 03:39:18;
  rebind 6 2022/06/04 14:23:47;
  expire 6 2022/06/04 17:23:47;
}
¶ Creating a GCP VPC Network:
This procedure allows you to connect to the VMware Engine Environment via jump-host. I prefer the VPN method documented above.
- Create VPC Network

Example below requires gcloud SDK or executed via the GCP CLI:
gcloud compute networks create provider-mgmt-network --project=vmc-multicloud --description=Provider\ Management\ Network --subnet-mode=custom --mtu=1500 --bgp-routing-mode=global && gcloud compute networks subnets create us-west2 --project=vmc-multicloud --range=100.64.0.0/20 --stack-type=IPV4_ONLY --network=provider-mgmt-network --region=us-west2 --enable-private-ip-google-access

- Enable API
- Go to PRIVATE SERVICE CONNECTION and select ENABLE API

3. Click on ALLOCATE IP RANGE

4. Allocate an internal IP range

5. Select PRIVATE CONNECTIONS TO SERVICES and click on CREATE CONNECTION

6. Create a private connection and click on CONNECT

7. Go to VPC NETWORK PEERING and Select the connection name of servicenetworking-googleapis-com

8. Select Edit

9. Select Import custom routes + Export custom routes and click SAVE

Create a Windows Server Jumphost
gcloud compute instances create jumphost --project=vmc-multicloud --zone=us-west2-a --machine-type=e2-medium --network-interface=network-tier=PREMIUM,subnet=us-west2 --maintenance-policy=MIGRATE --provisioning-model=STANDARD --service-account=921041346479-compute@developer.gserviceaccount.com --scopes=https://www.googleapis.com/auth/devstorage.read_only,https://www.googleapis.com/auth/logging.write,https://www.googleapis.com/auth/monitoring.write,https://www.googleapis.com/auth/servicecontrol,https://www.googleapis.com/auth/service.management.readonly,https://www.googleapis.com/auth/trace.append --create-disk=auto-delete=yes,boot=yes,device-name=jumphost,image=projects/windows-cloud/global/images/windows-server-2019-dc-v20220513,mode=rw,size=50,type=projects/vmc-multicloud/zones/us-west2-a/diskTypes/pd-balanced --no-shielded-secure-boot --shielded-vtpm --shielded-integrity-monitoring --reservation-affinity=any¶ Adding Private Connection to the VMware Engine API (REQUIRED)
- Go to Network > Private Connection and click on Add Private Connection

2. Add a Private Connection
3. The Peer Project ID, Peer Project Number can be located in the GCP Dashboard.

4. The Peer VPC ID and Tenant Project ID can be found under VPC

5. Enter all the required parameters and click Submit

6. In this step, you’re peering the GCP VPC Network with the VMware Engine API.
- This VPC peering mechanism will expose all network routes to the VM instance (jumphost) and will allow you to access the entire environment.
- Verify that both the VPC Peering Status and Region Status is Active and Connected

7. Exported Routes:

- This exports all the routes that are being used in the VMware environment to the GCP VCP; moreover, this allows the GCP VM instance access these segments.
- Notes about the VMware Engine API VPN Gateway:
- The VPN Gateway provides access to the predefined VMware infrastructure segments; however, I could not figure a method to add an additional NSX-T segment to the VPN gateway.
- It appears as a limitation on VMware side’s to facilitate access; moreover, it seems that they want customers to orchestrate a VPN server within NSX-T.
- After exploring access methodologies that would allow access to the entire infrastructure (+VM segments), the only method I found was to orchestrate a new GCP VPC and create a VPC peer link.
- This is the reason I documented creating a jump-host and a GCP VPC.
- The jump-host can access the entire VMware infrastructure due to the VPC peer link.
- Another possibility, to avoid using a jump-host is creating a classic VPN to the GCP VPC that is linked to the VMware engine as a private connection.
- The interesting thing about connecting a GCP VPC to the VMware infrastructure is that it exports the VMware routes exactly like I wanted to execute with the VMware Engine VPN Gateway.